Tuesday, December 27, 2011

A Little History

In late 2000, we made a deal for the purchase of a brand new 25 ft. Airstream Safari at a great price if we would pick it up in Kansas City before the end of February 2001.  We were living in Vermont at the time, so after attending a meeting in upstate New York, we hightailed it across the states of New York, Ohio, Indiana, Illinois, and Missouri and arrived with no time to spare.  The people at the dealership told us our sales person had not come into work in days (I still wonder what the story was), but there in the shop was our beautiful shiny Airstream - our Silver Twinkie. 

After the tour (I was desperately hoping that Max, at least, was listening, because I certainly couldn't), we bravely took off through rain and sleet on Interstate 70.  Max's beaming grin, however, quickly turned to puzzlement.  We had seen the photos of Wally Byam (Airstream's founding father) towing an Airstream with a bicycle.  Ours was pulling like a brick.  We pulled into a truck stop - that was a fun novelty - and discovered, verified by a phone call, that the dealer (who shall remain nameless) had forgotten to check the tire pressure.  The Airstream had been sitting on his lot for who knows how long!  But soon we were on our way, smiling foolishly again.  When we stopped at a rest area mid-afternoon and took a quick nap in our new bed, we were completely sold.

Through the years, we have traveled to many wonderful places and taken many cross country trips with the Airstream.  We have enjoyed Kentucky, Missouri, Minnesota, Wyoming, Colorado and, the place we eventually settled, Tucson.  Here we are the first summer in Hershey, PA, a memorable trip with our youngest son, then about 15.  (I'm not sure it is a fond memory for him - cozying up with Mom and Dad in 100 square feet of living space.)

We spent our 25th wedding anniversary in the Twinkie at the Grand Canyon, and our next anniversary at the North Rim.  We have enjoyed several trips to Rocky Point (Puerto Penasco) in Mexico where the RV park is right on the ocean's edge.  When the weather gets hot in Tucson and we can get away, we escape to the mountains.  Here we are in San Bernadino National Forest in California:


But, our Airstream is definitely a multi-purpose vehicle and has more uses than aluminum adventure.  We lived in it while building our first home in Tucson, and after we sold a later home in 2010 along with most of our furniture, we lived in it full time for a year (with the help of a storage shed).  Here is our patio and art studio in Western Way RV Park - a fun crowd!


But, there have been other uses also.  When Max became an auctioneer (a lifelong dream - and he has a great chant!), we used it as a base for a large equipment auction he held in Vermont.


And we used it as a sales office at Starr Ridge in Tucson before the model homes were open:


And in 2010, we stayed overnight in it to shorten our commute (and lessen the time we were imposing on friends) while engaged in a renovation project in an industrial park in Vermont.
It is truly a wonderful, versatile, cozy home.  When we purchased it, my sister asked me how many hotel nights we could pay for with that amount of money.  Obviously, it is so much more to us than an anonymous room, but I know that we long ago passed the point where we are receiving a huge return on our investment - both in delight and lucre.

It will be a vehicle for adventure for many years to come.  And the next adventure is - The Retro-vation.

Friday, December 23, 2011

Retro-vation - Floor

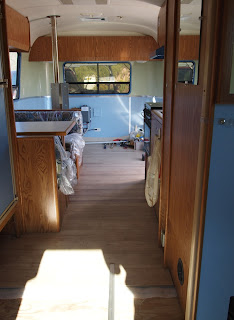
Although we had replaced the powder blue carpet with Pergo, when it came time for Retro-vation, we again replaced the flooring.  This time we used Armstrong laminate flooring left over from our last house project.  We thought 4 boxes (18.82sf/box) would do it, but ran a box short, only to discover that Armstrong had discontinued it in the 6 months since we first ordered it for our house.  Thanks to an incredibly persistent and wonderful Lowes’ employee (Melissa – you know who you are!), we scrounged up another couple boxes – one for the Airstream and one as a spare for our home.  I have higher hopes for the durability of this flooring.  It seems a little harder finish and has a groove so the edges shouldn’t be as susceptible to moisture.  The color is lighter, and seems to brighten things up.  (What is that pole thing on the left?  Stay tuned.)

The one mistake we made was to decide to run it all the way to the bathroom door, taking out the vinyl(?) tiles that were in front of the bathroom sink.  Big mistake.  Those tiles are attached to the plywood underneath with some glue that does not let go.  The tiles split in nasty splinter-y layers, the plywood underneath came up in chunks, and every little ¼” piece didn’t want to budge, making the whole removal of about 3 square feet take hours.  Just a nightmare all around.   When we finally finished getting it up, we had to use floor leveler to fill the gouges so we had a decent surface to the put the laminate on (it floats on a thin layer of foam underlayment).  It looks good, though, and means we didn’t have to have lay down a threshold until the shower/toilet door.

Thursday, December 22, 2011

Retro-vation - The Walls

So, given that the walls were aluminum, but full of unsightly holes and overlaps with sharp edges and covered with a yucky residue, what were we going to do?  That was the BIG QUESTION which occupied many sleepless nights.  We looked at vinyl at the fabric store – could we spray adhesive it on?  Could we buy sheet aluminum?  (The craftier Airstream renovators seemed to do that.)  What about that fake tin ceiling stuff?  How would that look?  Maybe we could strip and sand the walls and paint them?  What about buying a real wood veneer?  (Found a great website selling it.)  Everything had negatives.  The vinyl would show all the bumps, aluminum is expensive and any mistake would cause catastrophic remorse, sanding didn’t seems like a great idea, the curves would distort the patterns in the fake tin ceiling stuff, and real wood veneer would be sure to crack at the slightest pressure on an uneven surface.  What to do, what to do?  (You think like this in the middle of the night – when most major decisions are made.)

The answer for us was luan, a wonderful  product introduced to me by Max’s Dad – another Max.  I’d used it before to mouseproof cottage cabinets, so it was always a big hit with me.  It’s actually a laminated wood that is thinner and smoother than plywood.  (Sometimes it is spelled lauan.)  It’s about 1/8 inch thick, so bends fairly easily – a big issue with the curvy Airstream.  And, it can be easily painted.  I am a huge fan of high gloss oil based paint  which would give it a smooth, hard, washable surface.  (I know I’m supposed to love latex, but I just can’t.  It’s always so gloppy and the gloss is so dull.) 

We decided a two-tone look – upper pale green (it looks yellow in the photo, but it is really a nice soft green) and lower pale blue (shades of the powder blue carpeting!).  Knowing that we could not fashion pieces from measurements because of the curves, we made templates using craft paper and freezer paper, putting seams at places that seemed reasonable.  They did have significant arcs where the corner curves are.  Then we placed the templates on sheets of luan – really cheap stuff – (and a shout-out to the nice gentleman in the parking lot at Lowes who helped me load a couple sheets into my Ford Escape which wasn’t really large enough for them!) and cut them out with a Skil Saw.  The system I finally used was to prime them before cutting them, then cut them and then paint them (2 coats) with a good sanding between each coats.  There is still a grain visible, but overall it is a great look.  Here is photo showing the middle of the project. 


You can see the pieces of luan cut out and ready to install.  We found that it was a 2 person job to bend the luan.  The one on the left of the picture cracked when Max tried to put it in place.  We tried to strengthen the cracked place by gluing a piece behind it, but then it just cracked along the edge of the support.  So, we had to do a whole new one.  We had to push them in just a little, brace them (a paint bucket works well), then leave them overnight, then a little more, etc., until finally we were able to push them into the curve and secure them with screws. 


After we got the luan in place, (and it does snug behind the cabinets nicely), we used aluminum threshold from Lowes for a divider trim.  Max attached it with tech screws - it already is pre-drilled.  It cuts easily with a hacksaw for the curves where it meets the window trim.

 This is the "master bedroom" portion of the Airstream, showing the walls of the storage area under the bed still aluminum. (I later painted the floor white!)


And to the right is the "great room" section of the Airstream.


The "interior" walls, were painted in place.  Behind the dinette we removed the old fabric (the U-shaped trim piece can be pulled off with gentle persuasion - it just has tiny nails in the bottom of the U holding it in place) and where there was vinyl we sanded it and painted over it (discovered it was better to skip the primer on this).  Thus, see the bathroom sink area below.


Wednesday, December 21, 2011

Retro-vation - The Demolition

So, first you take everything out.  Well, not really.  Although we would have loved to replace the cabinets, this was a project on a budget, and that would have been an extravagance.  The good part is that we didn’t have to empty all the cupboards.  And a lot of things were just thrown in the closet.   Other items, such as the mattress and the dinette, were stored in the garage.  The bed frame had an adventure.  Max put it in an open shed at the RV lot with a note that it was just stored there temporarily and put his phone number on it.  A couple days later, I was working in the Airstream, and noticed that the shed was gone.  Yes, the previous day the shed had been demolished by the HOA.  Where was our bed-frame?  At the bottom of the demolition pile.  Well, when we recently put it back together again, we discovered that we luckily were able to find all the pieces, except for one piece of plywood on top.  Whew!   

With the furniture out, the ozite could be pulled right off, leaving a residue and a not-so-pretty surface underneath.  Apparently some items required “test holes” before the final screws were inserted.  And, there are places the aluminum overlaps.  It does not leave a lovely CCD shiny finish. 

When the flooring is removed, there is a nice layer of good-looking plywood with staples from the foam carpet underlayment (screw driver and needle nose pliers needed) and some round fasteners that manage to stick up in places even if you take an electric drill and try to screw them in.  I should have taken photos.  We finally removed the last of the pale blue carpeting from under the bed – which is in the outside storage compartments.  That was pretty foul.   

But, there we were, looking at a very bare and surprising spacious Airstream, that a few months ago had been Home Sweet Home.

Tuesday, December 20, 2011

Retro-vation - The Idea

In any remodeling project, there needs to be a vision.  Fortunately, Max - my partner in crime (and it always feels slightly criminal tearing up a perfectly adequate home or Airstream) - and I usually agree on a look we are trying to achieve.  It also usually begins with each side having certain non-negotiable items.  Max's was eliminating the "carpet" on the wall (it's actually called ozite) and what he called the "coffin curtains".  I actually liked the carpet, because you could put the hook side of Velcro on anything and stick it to the wall.  I did that under the dinette with the modem, wireless router, and computer cords.  Keeps everything tucked well away.  Here's a photo of patches from various parks we visited velcroed to the wall.  
But, it was true that the white ozite was showing some age.  It tends to develop black spots that are actually fine aluminum shavings from the wear and tear on the rivets. 

And, here is a photo of the "coffin curtains" that, to my way of thinking, ran on beautiful tracks around the interior. 

But then I had a non-negotiable item, also.  A new toilet.  Enough said.  BTW, it's good to pay attention to the height of a toilet when shopping.  We first bought a full-height one from Camping World, only to discover we forgot the toilet sits on a platform.  Well, the only one who might have been able to use it was a basketball player, and that's not who Airstreams are really optimal for.   

So, having discussed non-negotiables, we then got to the more fun part of deciding on a look.  That was easy - it was definitely a Retro-vation!  Airstreams have a lovely history, and we love looking at photos of them through the years.  Although we are not fanatics about authentic details, we knew we would love to try to achieve a retro look.

Monday, December 19, 2011

Retro-vation 2011

Having lived in our Airstream full time for a year (2010 to 2011), we were ready for a change.  I should mention that we have lived in 7 different houses in the last 10 years, many of which we renovated or finished ourselves. (This does not include a lake cottage which we also fixed up, or a rental property which we renovated, the year in the Airstream, or some miscellaneous other building projects.) Thus, the only thing consistent about us is our inconsistency.  Change is good!  As such, the Airstream actually had a pretty good run in going ten years without a “renovation”.  But, there were a couple minor projects.   This photo shows the results of both (did I mentioned we also had a real estate business while we were living full time in the Airstream?).  We call it Home Sweet Office.

Carpet
     
The first (which probably should have been done a lot sooner than we did it) was to eliminate the baby blue carpeting that it came with.  (Yes, you read that right – pale blue.)  I know the Airstream brand has a certain sophistication to it, but someone apparently forgot that it is for camping. 

The first solution was, of course, put throw rugs everywhere.  But, we finally broke down a few years ago and installed laminate flooring – a nice Pergo medium brown.  It was great, but not indestructible.  There was the time the lock on the closet door failed and the TV tumbled out and made a serious dent in the floor (the TV was fine!).  And there were a couple dog water dish accidents that raised the edges on some of the boards.  Thus, stay tuned for the new look.


The Couch

Airstream comes with a wonderful couch (see above picture) that pulls out into a bed, has storage underneath, and has storage bins under the arms.  Too good to be true?  Yes.  It was, sad to say, uncomfortable to sit on.  We inevitably ended up sitting on the dinette cushions and letting the dogs sleep on the couch (on horse blankets – which I highly recommend).  So, when we were moving full time into our Airstream after selling our house, we took out the couch, traded it to a local dealer for some maintenance work, and replaced it with a couple leather wingback chairs.  They were wonderful as long as we weren’t traveling.  We did put non-slide pads under the feet, which really helped on the road, but they were heavy and awkward.  Now that we have a house again, they are in our living room, so we are again challenged with seating.